Challenge Overview
Challenge: Zenmaster
Category: Reverse Engineering
Difficulty: Easy (though it didn’t feel easy!)
We’re given:
- A tar file
zenmaster.tgzcontainingcpu008A0F00_ver08A000FF.bin - A remote service that accepts base64-encoded ELF files
- Challenge description mentioning a “new CPU” requiring beta testing
The provided .bin file is just a bunch of data, it contains nothing that binwalk could recognize, nor any useful strings, with little information I started googling (or duckduckgoing?) the file name and any of the IDs that contains, and I found a github repo which contains a similar name:
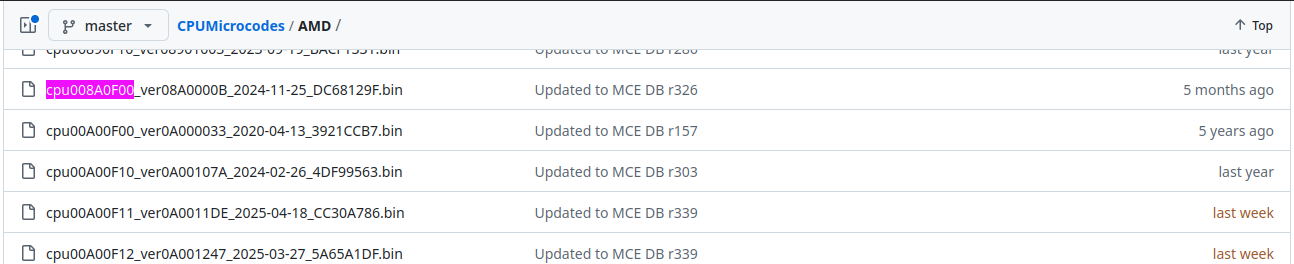
It turns out that this is an AMD microcode patch! but what is a microcode? and what’s a microcode patch? and what does it have to do with the CPU?
Connecting to the provided service revealed that it accepts Base64-encoded ELF binaries.
To confirm, I tested it with a simple Hello World program, which ran without any issues.
However, when I tried uploading a binary to spawn a shell, it failed ; no surprise in hindsight.
Running ls via a custom binary listed files:
Thanks! I will run it now
bin
bin.usr-is-merged
boot
cdrom
challenge.py
cpu008A0F00_ver08A000FF.bin
dev
etc
home
lib
lib.usr-is-merged
lib64
lost+found
media
mnt
opt
proc
root
run
sbin
sbin.usr-is-merged
snap
srv
swap.img
sys
tmp
usr
var
No flag.txt as expected, but the presence of challenge.py caught my eye.
I then compiled another binary to read /challenge.py, which revealed the challenge’s logic:
#!/usr/bin/python3 -u

import base64
import os
import subprocess
import sys
import tempfile

print("Zen Master challenge for WHY2025 CTF by Daan Keuper")

try:
   print("Please give me your base64 encoded ELF file for testing: ", end="")
   c = sys.stdin.buffer.readline()
   c = base64.b64decode(c)
except:
   print("\nInvalid base64")
   sys.exit(-1)

if len(c) > 1024 * 100:
   print("\nFile exceeds 100kb maximum")
   sys.exit(-1)

fd, path = tempfile.mkstemp()

print("\nThanks! I will run it now")

try:
   with os.fdopen(fd, "wb") as tmp:
       tmp.write(c)

   os.chmod(path, 0o755)

   output = subprocess.check_output(["/usr/bin/taskset", "-c", "2", "/usr/bin/firejail", "--net=none", "--private", path], stderr=subprocess.DEVNULL, timeout=3).decode().strip()

   print(output)
except subprocess.TimeoutExpired:
   print("Timeout exceeded")
except:
   print("Something went wrong, invalid ELF maybe?")
finally:
   os.unlink(path)
No flag here either 🤷♂.
Up to this point, the challenge still didn’t make much sense ; especially since the microcode aspect hadn’t come into play yet. We also hadn’t touched the .bin file that was provided.
One thing was clear though: the subprocess execution is heavily sandboxed using firejail with no network, a private filesystem, and CPU pinning ; meaning an interactive shell was never going to work in this environment.
At this point, the only real lead was the “microcode” angle. The challenge name Zenmaster pushed me to google zenmaster microcode, which led to a gem ; Google Bug Hunters’ blog post Zen and the Art of Microcode Hacking.
It’s basically a crash course in AMD microcode internals, including a tool called zentool that can disassemble, patch, and inspect microcode blobs. Perfect.
I ran:
zentool print --all cpu008A0F00_ver08A000FF.bin…which dumped 64 “OpQuad” entries. Here’s a snippet:
; Patch 0x8a000ff OpQuad Disassembly (64 total)
; (use --verbose to see further details)
.quad  0, 0x00000001    ; @0x1fc0
       mov             reg15, reg15, rax
       mov             reg14, reg14, 0x907f
       shl             reg14, reg14, 0x000c
       add             reg14, reg14, 0x01a9
...
.quad  2, 0x00000001    ; @0x1fc2
       shl             rbx, rbx, 0x0010
       mov             reg15, reg15, 0x6761
       shl             reg15, reg15, 0x0010
       add             reg15, reg15, 0x6c66
...
Running:
zentool print -m ../cpu008A0F00_ver08A000FF.bin showed:
; Patch 0x8a000ff Match Registers (44 total)
; (use --verbose to see empty slots)
       [0 ] 0CE0
Research revealed that 0CE0 on this CPU maps to the fpatan instruction. This means triggering fpatan should execute the associated microcode quads.
I wrote a small binary to call fpatan, but on the remote host it just crashed ; no debug info, no clues. Time to check the disassembly.
The raw output was noisy, with repeated lines, this stripped version makes the data flow and the XOR operations much easier to follow.
mov             reg15, reg15, rax
mov             reg14, reg14, 0x907f
shl             reg14, reg14, 0x000c
add             reg14, reg14, 0x01a9
sub             reg0, reg0, reg14
ld.p            7:[reg0+0x3d2], reg0
mov             rax, reg0, 0x0041
mov             rbx, reg0, 0xf1a9
shl             rbx, rbx, 0x0010
mov             reg15, reg15, 0x6761
shl             reg15, reg15, 0x0010
add             reg15, reg15, 0x6c66
add             rbx, rbx, 0x0004
mov             reg15, reg15, 0x007b
add             rbx, rbx, 0x0001
mov             reg14, reg14, 0x4257
ld              reg13, ms:[reg14+reg0]
mov             reg15, reg15, 0x3a1b
shl             reg15, reg15, 0x0010
add             reg15, reg15, 0xd1d0
xor             reg15, reg15, reg13
add             rbx, rbx, 0x0004
mov             reg15, reg15, 0x6a4f
shl             reg15, reg15, 0x0010
add             reg15, reg15, 0x82d3
xor             reg15, reg15, reg13
add             rbx, rbx, 0x0004
mov             reg15, reg15, 0x6a18
shl             reg15, reg15, 0x0010
add             reg15, reg15, 0x8583
xor             reg15, reg15, reg13
add             rbx, rbx, 0x0004
mov             reg15, reg15, 0x6f14
shl             reg15, reg15, 0x0010
add             reg15, reg15, 0x8381
xor             reg15, reg15, reg13
add             rbx, rbx, 0x0004
mov             reg15, reg15, 0x6f4e
shl             reg15, reg15, 0x0010
add             reg15, reg15, 0x83d3
xor             reg15, reg15, reg13
add             rbx, rbx, 0x0004
mov             reg15, reg15, 0x694d
shl             reg15, reg15, 0x0010
add             reg15, reg15, 0x86d0
xor             reg15, reg15, reg13
add             rbx, rbx, 0x0004
mov             reg15, reg15, 0x3d1f
shl             reg15, reg15, 0x0010
add             reg15, reg15, 0x8cd2
xor             reg15, reg15, reg13
add             rbx, rbx, 0x0004
mov             reg15, reg15, 0x6d1b
shl             reg15, reg15, 0x0010
add             reg15, reg15, 0xd0d1
xor             reg15, reg15, reg13
add             rbx, rbx, 0x0004
mov             reg15, reg15, 0x007d
Let’s skip the setup and focus on these instructions:
mov    reg15, reg15, 0x6761
shl    reg15, reg15, 0x0010
add    reg15, reg15, 0x6c66
add    rbx,   rbx,   0x0004
mov    reg15, reg15, 0x007b
add    rbx,   rbx,   0x0001
They’re straightforward: 0x6761 goes into reg15, it’s shifted left by 0x10 bits, then 0x6c66 is added. This results in 0x67616c66, which is simply "flag" in hex.
After writing those 4 bytes, rbx is incremented by 0x4 ; suggesting it’s a counter tracking output position. Next, 0x7b ('{') is placed into reg15 and rbx is incremented by 0x1. The pattern is clear: the code is loading the flag into reg15 in chunks, advancing rbx accordingly.
Then:
mov    reg14, reg14, 0x4257
ld     reg13, ms:[reg14+reg0]
This fetches a value from memory at reg14 + reg0. The tricky part is that at the microcode level, it’s not obvious whether these addresses map to normal program memory or to CPU-internal storage.
Earlier in execution, reg0 was manipulated like this:
mov    reg15, reg15, rax
mov    reg14, reg14, 0x907f
shl    reg14, reg14, 0x000c
add    reg14, reg14, 0x01a9
sub    reg0, reg0, reg14
ld.p   7:[reg0+0x3d2], reg0
mov    rax, reg0, 0x0041
mov    rbx, reg0, 0xf1a9
shl    rbx, rbx, 0x0010
So reg0’s value comes from a load (ld.p) after being offset by calculations on reg14. This setup likely determines the base address used for subsequent data loads into reg13.
One thing that stood out while going through this is how the mov semantics seem to work: when moving an immediate to a register, it actually writes to the memory location pointed to by that register; when moving from register to register, it’s transferring the register’s value directly. The ISA itself is still hazy (proprietary) ; even Google’s bug hunter blog notes there’s a lot about RISC86 we don’t fully understand.
The subtraction from reg0 earlier is a good example ; without knowing its initial value, it’s impossible to reason about the exact address it ends up pointing to. That missing value becomes critical here, because we keep seeing reg13 show up in XOR operations, and reg13 is loaded from [reg14+reg0] earlier. Without knowing how to access that address space or retrieve reg13, we can’t immediately recover the flag.
Looking at this block:
mov    reg15, reg15, 0x3a1b
shl    reg15, reg15, 0x0010
add    reg15, reg15, 0xd1d0
xor    reg15, reg15, reg13
add    rbx,   rbx,   0x0004
…the same pattern repeats:
- Construct a 4-byte constant in
reg15. - XOR it with
reg13. - Increment
rbxby 4 (suggesting it’s a position counter).
The constants are:
3a1bd1d0
6a4f82d3
6a188583
6f148381
6f4e8343
694d86d0
3d1f8cd2
6d1bd0d1
The final instruction in the sequence:
mov reg15, reg15, 0x007dwrites 0x7d (}), marking the end of the flag.
In short, this section is assembling the flag chunk-by-chunk by XORing known constants with an unknown 4-byte value from reg13. The missing piece is how to get the original reg13 data ; without it, the XOR can’t be reversed to recover the actual flag bytes.
Non-intended solution
The next step depends heavily on the flag format:
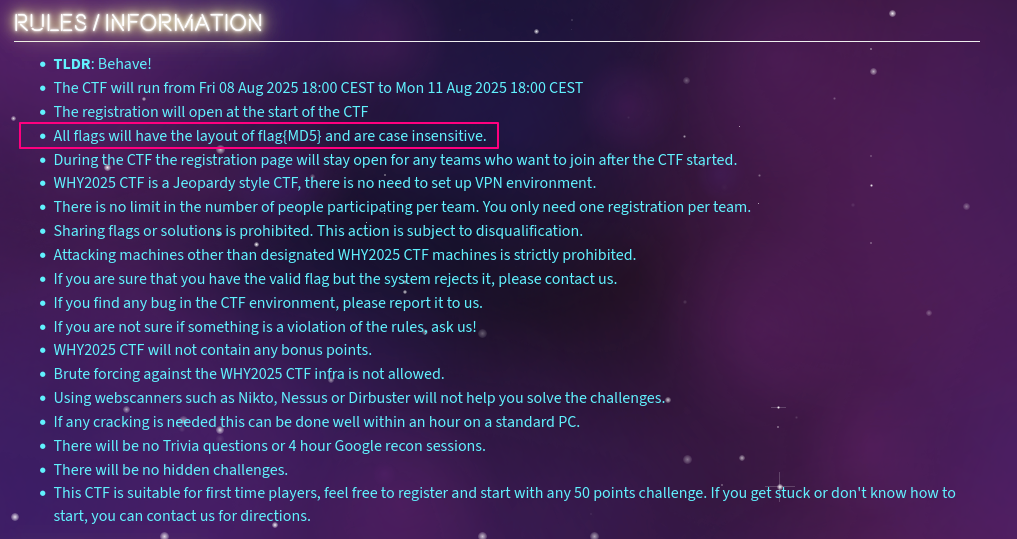
Since the flag is an MD5 hash and case-insensitive, we know it consists of hexadecimal characters (0-9, a-f). This means the 4-byte value we’re looking for, when XORed with each 4-byte chunk from the disassembly, should produce ASCII strings limited to those hex characters. I wrote a simple Python script to brute-force this XOR key ; and surprisingly, it narrowed down to only 64 possible flags:
flag{0d7a37c1c041a68436b403a2293f1e76}
flag{0d7b37c2c042a68736b703a1293e1e75}
flag{0d7c37c3c043a68636b603a0293d1e74}
...
flag{0d7d37c4c044a68136b103a7293c1e73}
flag{0d7e37c5c045a68036b003a6293b1e72}
flag{7e7146cad14af78d47bd72ab58366d7f}
flag{7e7646cfd14ff78c47bc72ae58316d7a}
Brute forcing is technically forbidden by the CTF rules, but hey; before you call me out 😅; I’ve already spent hours on this, and it’s 5 AM. I can’t just hit the sack without at least submitting something.
Plus, there’s a loophole: the rules say “no limit on number of participants per team, only one registration needed.” So, imagine having 64 teammates, each testing one flag. Perfectly legit, right?
To automate this, I wrote a script to submit all flags sequentially with a delay:
import requests

XSRF_TOKEN = "<redacted>"
URL = "https://ctf.why2025.org/actions/challenges.php"

flags = open("./flags.txt").read().split("\n")

def submit_flag(challenge_id, flag):
   data = {
       "action": "submit_flag",
       "challenge": challenge_id,
       "flag": flag,
       "xsrf_token": XSRF_TOKEN
   }
   headers = {
       "Content-type": "application/x-www-form-urlencoded; charset=UTF-8",
       "Cookie": "<redacted>"
   }
   try:
       response = requests.post(URL, data=data, headers=headers)
       response.raise_for_status()
       json_resp = response.json()
       print(f"Response for challenge {challenge_id}, flag {flag}:")
       print(json_resp)
   except Exception as e:
       print(f"Error submitting flag {flag} for challenge {challenge_id}: {e}")

if __name__ == "__main__":
   import time
   for flag in flags:
       submit_flag(102, flag)
       time.sleep(5)
And bam; within seconds, it found the real flag:flag{0e7636cfc14fa78c37bc02ae28311d7a}
Intended Solution
The challenge server is unfortunately down now, so I can’t reproduce the intended solution. However, the challenge author provided some valuable hints on Discord that shed light on the proper approach. They mentioned using ZenUtils (https://github.com/AngryUEFI/ZenUtils) to decrypt the micropatch, explaining that it patches the fpatan instruction and expects a specific sentinel value in the rax register. When this value is correct, the microcode decrypts the flag and places it at a fixed location in virtual memory, requiring that the page be properly mapped.
Armed with this information, I revisited the disassembly using ZenUtils with the Zen1 architecture, which produced much more meaningful results. The previously confusing instruction sub reg0, reg0, reg14 that I couldn’t make sense of (since we didn’t know reg0’s initial value) now appeared as:
sub.Z reg0, reg14, reg14
jnz.z 0x1fd2
mov rax, 0x41
mov rbx, 0xf1a9
This makes perfect sense now. The instruction subtracts reg14 from itself, which will always result in zero, and the conditional jump jnz.z (jump if not zero with zero flag) creates a branch based on this result. The logic becomes clear when you understand that this is essentially a conditional check mechanism.
I also noticed that every time an XOR operation occurred in the original disassembly, this instruction was executed: mov ls:[rbx], reg15. This suggests that the decrypted flag bytes were being stored in memory at the address pointed to by rbx, which aligns with the author’s hint about placing the flag at a fixed memory location, which also explains the increments.
The mystery XOR key in reg13 becomes clearer with the corrected disassembly:
add rbx, rbx, 0x1
mov reg14, 0x4257
mov reg13, msr1:[reg14]
The value is loaded from what appears to be a model-specific register (MSR), though the exact meaning of msr1 remains unclear due to limited documentation on microcode assembly syntax.
Epilogue
This highlights how important proper tooling is for reverse engineering. While zentool provided basic disassembly capabilities, ZenUtils offered architecture-specific decoding that revealed the true program logic. The conditional branches, memory operations, and register usage patterns that seemed cryptic in the generic disassembly became coherent when viewed through the lens of the correct architectural context.
The intended solution would have involved crafting an ELF binary that calls the fpatan instruction with the correct sentinel value in rax, triggering the microcode patch execution on CPU core 2 where it was active. The microcode would then decrypt the flag in-place and store it in accessible memory, eliminating the need for brute force entirely.
This experience reinforced several important lessons about reverse engineering complex systems. First, having the right tools makes an enormous difference in understanding. Second, when documentation is sparse, as it is with microcode internals, experimentation and community knowledge become invaluable resources. Finally, sometimes the most elegant solutions emerge from understanding the system’s intended behavior rather than working around it.
I plan to revisit this challenge when I have more time to properly explore microcode analysis techniques. The intersection of low-level hardware behavior and software exploitation opens fascinating research avenues that extend far beyond CTF challenges. If anyone reading this has deeper knowledge about microcode internals or notices any technical inaccuracies in my analysis, I’d welcome the feedback.
Special thanks to the WHY2025 CTF organizers for creating such an educational and unique challenge. It’s rare to encounter problems that genuinely introduce entirely new domains of knowledge, and this challenge exemplified the best of what competitive hacking can offer.
Thanks for following this journey through the depths of CPU microcode. Until the next writeup, inshaa’Allah.